 ColonyCat
Inviting your team
Most rescues have at least a few people involved. ColonyCat lets you bring them in, give each one the right level of access, and let them tag themselves with the things they're good at: trapping, transport, foster care, monitoring.
This chapter shows how to invite a teammate, what the three roles do, and how to manage their access and skills.
What you're about to do
- From your Organization page, fill in the Invite a member form with their email.
- Pick a role. Three to choose from.
- They get an email inviting them to join. No password.
- Once they accept, they can tag their own skills on their profile.
Step 1: Open the invite form
Click your rescue's name (top right). You land on the Organization page, with the invite form right at the top.
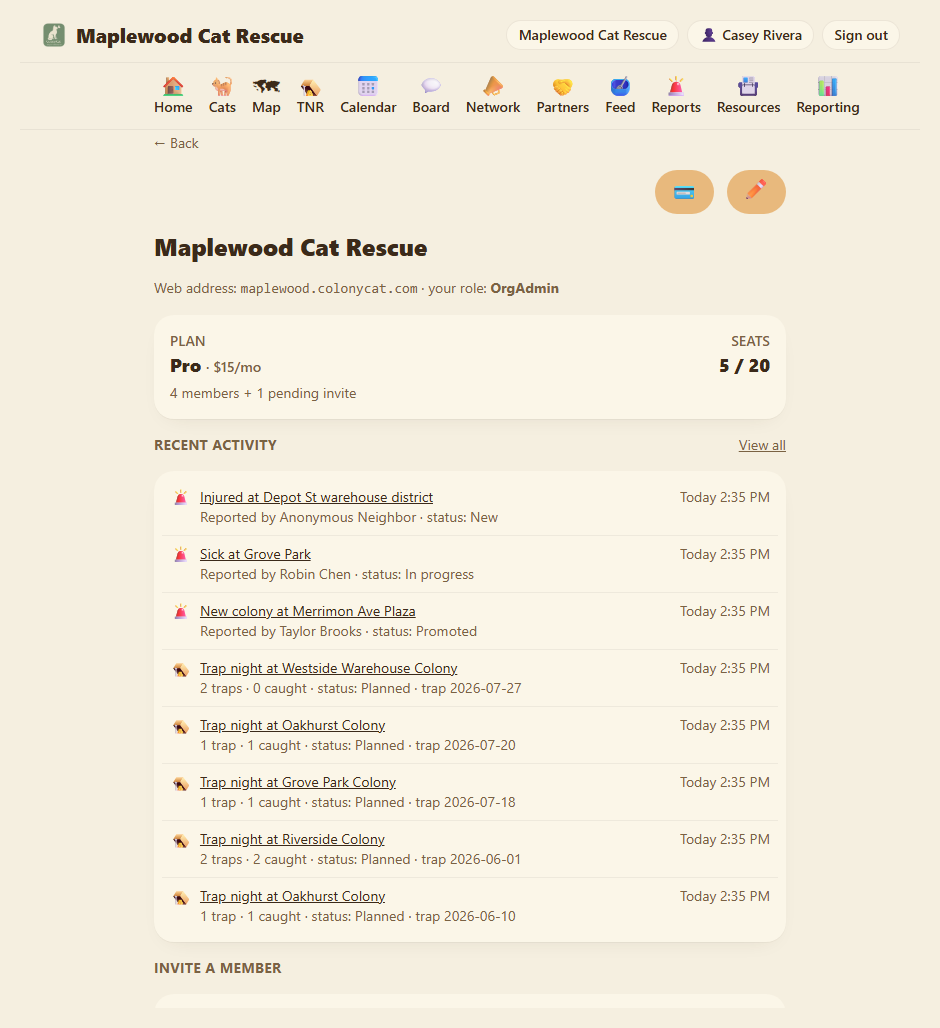
Email. Their address. Lowercase, no spaces. If you don't have it yet, ask them for it before you invite, the invitation comes here.
Role. Three options, with no right answer for everyone. See the next section.
Click Send invite. They get an email immediately, and a "pending invite" entry shows up below the form so you remember who you're waiting on.
If you need to send the invite again (the original got lost or the link expired), click Resend on the pending entry. If you want to cancel the invite, click Revoke.
Step 2: Pick the right role
ColonyCat has three roles inside an organization:
OrgUser, foster / volunteer. The default. They can see colonies, cats, and the TNR board. They can log feedings, file reports, and have their name attached to trap nights and catches. They can't invite other members, edit billing, or change settings. They can be assigned to specific colonies only (see Step 4 below). Use this for most volunteers.
OrgStaff, invite + edit. Same as OrgUser plus: they can invite other members, edit the colony, cat, and TNR records. They can't change billing or delete the org. Staff always see every colony. Use this for trusted coordinators who help run the rescue.
OrgAdmin, everything. Full access. They can edit billing, change the public page, even delete the org. There's no special distinction between "owner" and "admin", any OrgAdmin has the same power. Admins always see every colony. Use this for co-founders and anyone you trust to act on your behalf.
You can change roles anytime. Promote a volunteer to staff after they've been around a while. Demote an admin who's stepped back. Click their name in the Members list to open their profile, then change the role and save.
Step 3: They accept
Your new teammate follows the invitation in their email and signs in with a quick 6-digit code. It takes them straight into your rescue's dashboard. They don't need to set a password, fill in a profile, or do anything else first.
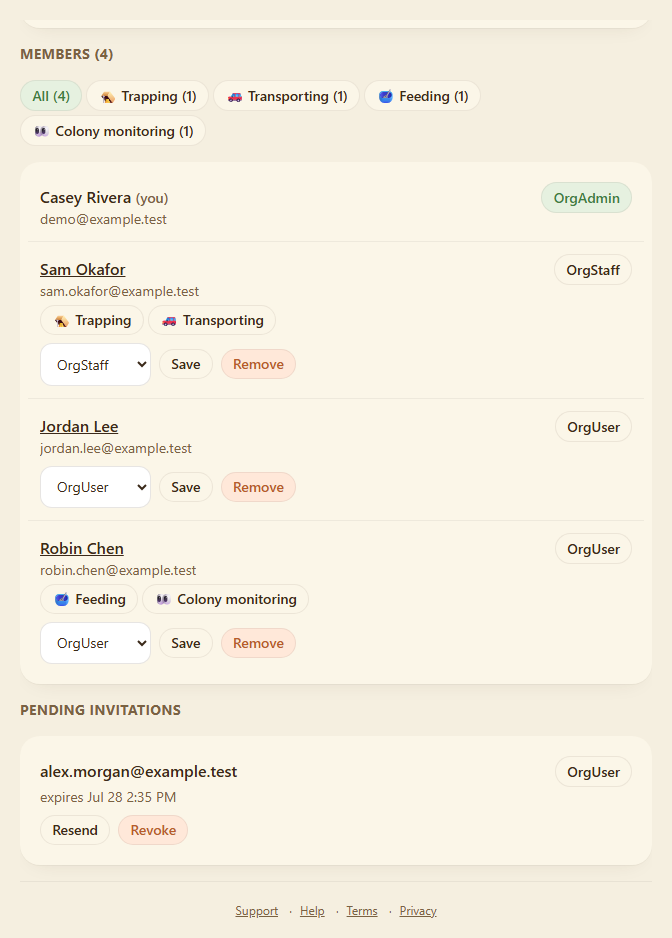
Their name shows up in the Members section. The "pending" entry disappears.
The accept link expires after seven days. If it expires, just send a fresh invite from the pending list.
Step 4: Colony access (OrgUsers only)
If you use per-colony scoping, you can limit OrgUsers to specific colonies. This is useful when you want a volunteer to work with only a subset (maybe they're a foster who only cares about one kitten colony, or they live in one neighborhood).
Open the member's profile (click their name from the Members list). Below the basic info, you'll see a Colony access panel (this only appears for OrgUsers). There are two options:
All colonies (the default). They can see and work with every colony in your org, including any added in the future.
Specific colonies. Uncheck "All colonies" and tick the ones they should see. They'll only be able to log feedings, file reports, and view cats in those colonies. On the calendar they'll see trap nights and events for those colonies, org-wide events, and any event they've been invited to.
Important: if you promote an OrgUser to OrgStaff or OrgAdmin, their per-colony restrictions are lifted and they get full access. If you ever demote them back to OrgUser, you'll have to set up their colony access again.
Step 5: Skills
Each member can tag their own skills on their My profile page. They see a section called Skills with checkboxes:
- 🥣 Feeding. Reliable feeder.
- 🪤 Trapping. Knows how to set traps, handle scared cats.
- 🚗 Transporting. Has a car, willing to drive to clinics.
- 🏠 Fostering. Has space to host a recovering cat for a day or two.
- 👀 Colony monitoring. Keeps an eye on the colony, watches for new cats or problems.
- 📋 Reporting cats. Good at submitting reports with photos and details.
Members set their own, but you (as an admin) can see what they've chosen by clicking their name in the Members list. Their skills show as read-only chips under "Can help with", so you know what they can do.
The point of this isn't bureaucracy, it's so when you're planning a trap night you can find "who has the foster space this week" in one click instead of texting everyone.
Right under the Members heading on the Organization page there's a row of skill chips. Tap 🚗 Transporting and the member list narrows to just your drivers; tap it again to clear. That's the fast way to answer "who can do X" without scrolling everyone's profiles.
Step 6: Find volunteers
On the Organization page, there's a Find volunteers near you link. This opens a directory of people from other ColonyCat groups who have opted into the volunteer directory. You can see their skills and general location, and reach out to invite them to help.
On trap night and catch forms, when you start typing a name in the Trapper, Transporter, or Caregiver field, the dropdown suggests members and volunteers. "Trans" surfaces people tagged with Transporting.
This becomes really useful when your team grows past five or six people or when you need emergency help.
Where you are now
- Your rescue has more than one member.
- Each member has a role that matches how much access they need.
- Members can set their own skills, and you can filter by them.
- You can limit OrgUsers to specific colonies if needed.
In Chapter 8 we cover your public-facing page, the landing visitors see at yourgroup.colonycat.org.
A few sanity-savers
- Seats: how many can you have? The free plan covers two people total. Paid plans go up to 10 (Core), 20 (Pro), or 40 (Max). Verified 501(c)(3) rescues get 25% off any paid plan, same seat count. See Chapter 9 on billing for how to upgrade or manage your plan.
- Pending invites count as a seat. If your free plan has two seats and you have one member and one pending invite, you're full. Cancel the pending invite if you want to invite someone else.
- Resend and Revoke on pending invites. Hover over a pending invite in the Members section to resend the email or revoke (cancel) the invite.
- Removing a member doesn't delete their records. Trap nights and catches they were on, feedings they logged, reports they filed, all that stays. They just can't sign in to this rescue anymore.
- Last OrgAdmin can't be demoted or removed. Every rescue needs at least one admin. Promote someone else first if you want to step back.
→ Next: Chapter 8: Your public page