 ColonyCat
Adding cats
Each cat gets its own page in ColonyCat. A name, a photo or three, a status that tracks where they are in the TNR pipeline, a few tags for the things you want to flag (Sick, Pregnant, Friendly), and a little space to describe their personality.
That sounds like a lot but a new record takes about a minute. You can also start with just a name and add the rest later as you learn the cat.
What you're about to do
- Tap ➕ Add cat from a colony page (or from the Cats menu).
- Type a name, pick a status, optionally tag what you see.
- Save. Open the cat back up and add photos when you have them.
Step 1: Add a cat
The fastest way: go to a colony's page and tap the ➕ button in the cats section. That pre-fills the colony field for you.
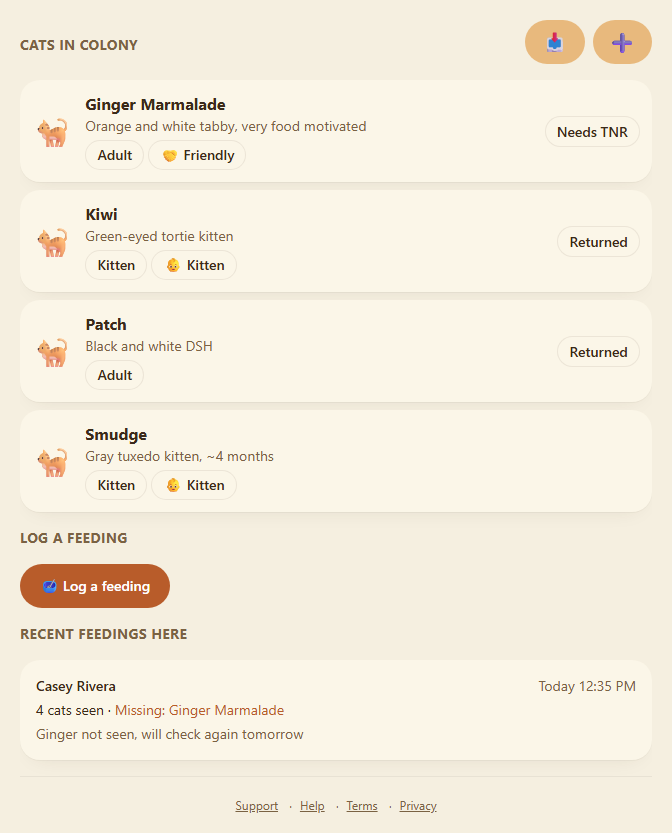
Or go to 🐈 Cats in the nav and tap the ➕ there. Same form either way.
Step 2: Tell us about the cat
Name. Pick something distinct. "Gray Tabby" is fine when you first spot a cat but you'll thank yourself later for naming her "Pearl." If you have three orange cats, name them.
Sex. Male, Female, or Unknown if you don't know yet. Update when you find out.
Age. A dropdown right after Sex: Kitten, Adult, or Unknown (the default). This is the cat's age category kept as structured data, a Kitten is under five months. It's separate from the 👶 Kitten and 🐈 Senior quick-flag tags further down: the Age dropdown is the single, reportable age, while the tags are just for flagging and filtering at a glance.
Colony. The colony the cat lives in. Pre-filled if you came from a colony page.
Lifecycle status. This is the most important field. It tells the TNR board where this cat is right now:
- Needs TNR. Not spayed/neutered yet.
- Trapped. Currently in a trap, waiting for surgery.
- Recovering. Just had surgery, healing in a crate.
- Returned. Spayed/neutered and back in the colony. The goal state for community cats.
- Adopted. Living in someone's home.
- Retired. Aged out of the colony and being socialized for adoption.
- Transferred. Handed to another organization to carry through to adoption (some rescues call this surrendered).
- Missing. Hasn't been seen in a while. Worth flagging.
- Deceased. Sadly. You can leave the record so other volunteers don't keep looking.
Cats can be in only ONE status at a time. The other things you want to flag (Sick, Pregnant, in foster) go in Tags below.
Description. Color, build, distinguishing marks. "Calico with white socks, notch in left ear." This is for identifying the cat at a glance, especially when two cats look similar.
Intake date. Optional. The day this cat actually came under your care, which can be different from the day you type the record in. Leave it blank if you don't know.
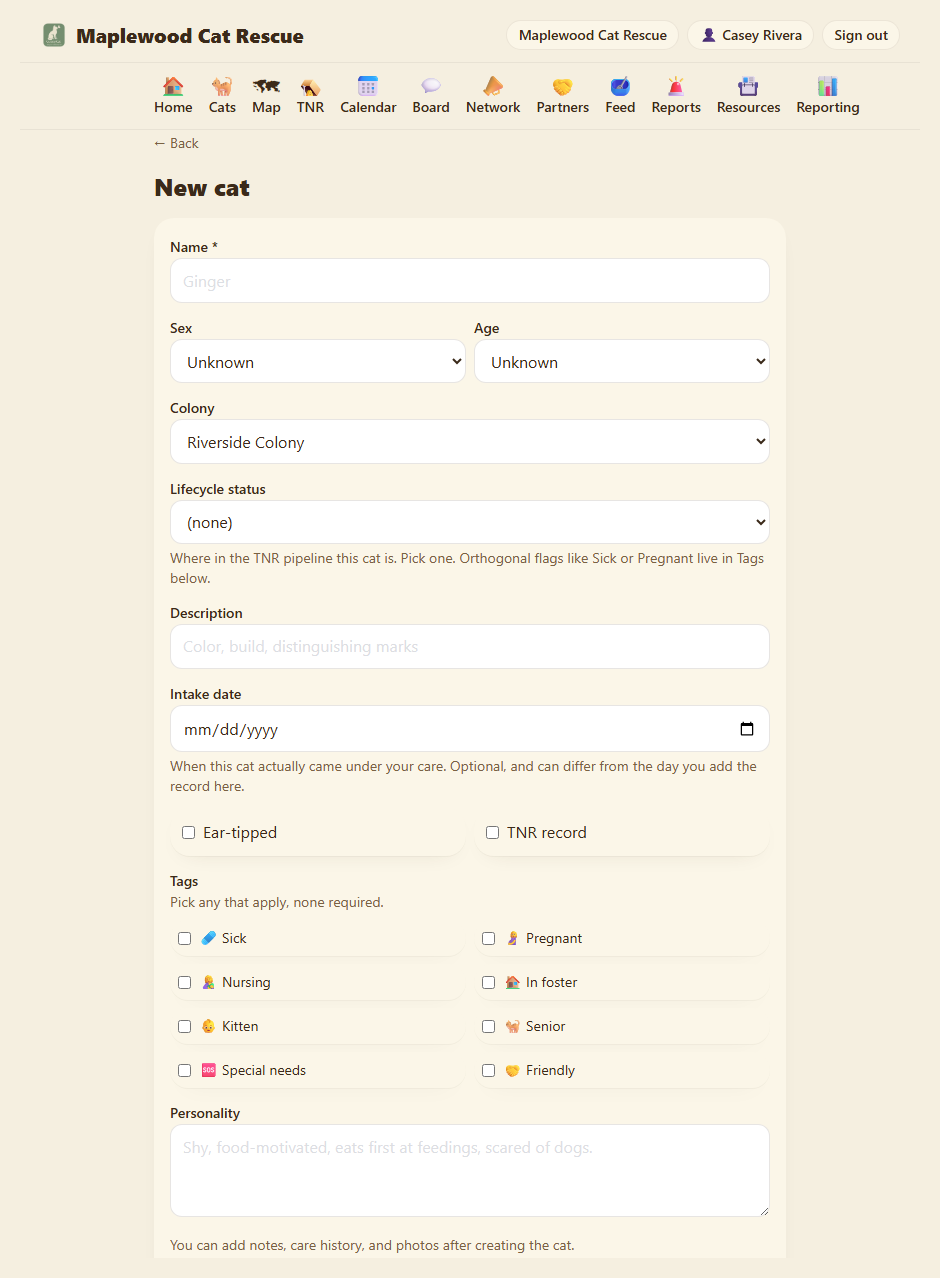
Ear-tipped. Tick this if the cat has the universal "I'm spayed/neutered" left-ear tip. Skip if not.
TNR record. Tick this if you have a record of this cat being spayed/neutered, even if you can't see the ear tip clearly. It's an extra confidence flag.
Tags. Things to flag about the cat right now. Tick all that apply:
- 🩹 Sick, Sneezing, limping, eye gunk, looks bad. Flag it.
- 🤰 Pregnant, Don't trap for surgery until after birth.
- 🤱 Nursing, Kittens nearby that depend on her.
- 🏠 In foster, Currently in a foster home rather than the colony.
- 👶 Kitten, Under six months, probably.
- 🐈 Senior, Older cat, may need extra care.
- 🆘 Special needs, Anything ongoing, diabetes, missing a leg, etc.
- 🤝 Friendly, Comes to people, possibly adoptable.
Tags can be combined. A Sick, Pregnant, Friendly cat is a thing.
Personality. Free text. "Shy with strangers, comes right up to me. Eats first, leaves room for the other cats." This is useful for whoever traps her, transports her, or fosters her later. It also helps you remember which cat is which after you have twenty of them.
That's the whole new-cat form. There's no notes box here on purpose: notes, care history, and photos all get added on the cat's page after you create the record, where there's room to log them over time.
When everything looks right, click Create cat. You land on the new cat's page.
Adding a whole colony's worth at once? Click Save and add another instead. It saves this cat and drops you back on a fresh, empty form with the colony already filled in, so you can rattle through a stack of cats without bouncing back and forth.
Step 3: Add photos
You land on the new cat's page. Scroll down to the Photos section and click 📷 Take or choose photo.
On a phone, this opens your camera or photo picker. Take a square-ish photo with the cat centered, the system makes a circle thumbnail and an off-center cat loses their head. You can add up to three photos. The first one becomes the avatar shown everywhere this cat appears.
Step 4: Notes, the running log
Below the photos is the Notes section: a running log of short entries, newest first. Click + Add note, type what you saw, and save. Feeding observations, behavior, a limp you noticed, whoever reported her, anything worth remembering.
Anyone with access to the colony can add a note, so notes double as the shared thread on a cat. Tick Notify staff when you add one if it's something your OrgAdmins and staff should see right away. Notes also feed search (see below), so a note that mentions "notch left ear" makes that cat findable later.
Step 5: Care history
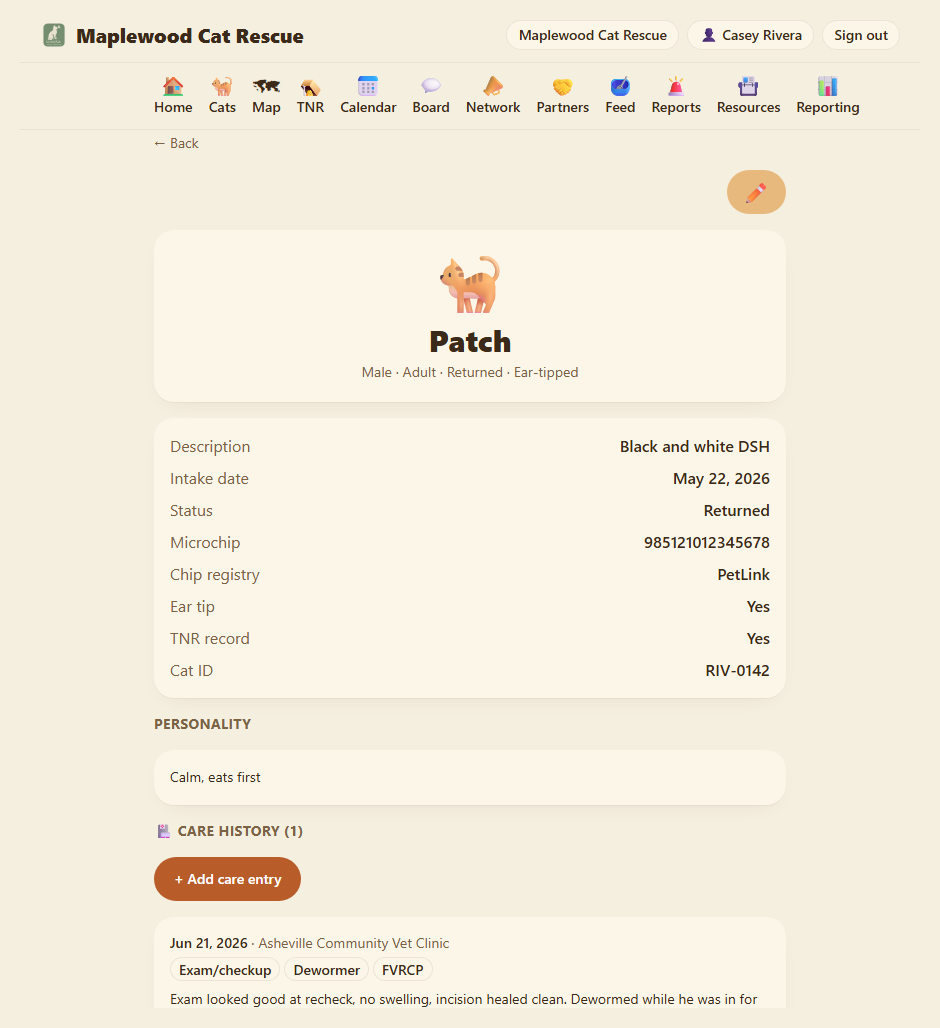
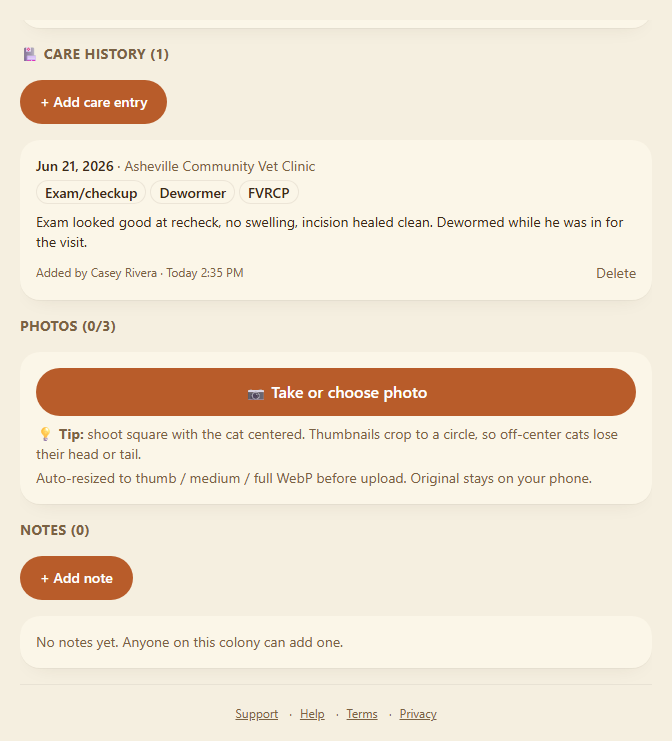
Under Notes is 🏥 Care history, the medical record for this cat: vet visits, surgeries, vaccines, and treatments. An OrgAdmin or staff member sees an + Add care entry button; everyone else sees the history read-only.
A care entry has:
- Date and Clinic. When and where. The clinic field suggests names you've used before.
- Services. Checkboxes grouped into Surgery, Vaccines & tests, Parasite & meds, and Other. Ticking Spay, Neuter, or Ear tip also sets the cat's ear-tip and TNR-record flags for you.
- Notes. Free text for dosages, weight, complications, recheck dates. Optional if you checked at least one service.
- Attach records. Photos or PDFs of the actual vet paperwork, a few files per entry.
More fields on the Edit page
A cat's identity fields all live on the ✏️ Edit page (OrgAdmin and staff only). A couple you won't have seen on the quick add form:
- Microchip number and Microchip registry. If the cat is chipped, record the number and which service it's registered with (HomeAgain, 24PetWatch, and so on). A chipped cat shows a small 🔖 next to its name in the cats list.
- Cat ID. A read-only line that only appears once it's set. This is the cat's ID from your own records, and it's filled in by the spreadsheet import (see below) from the Cat ID column. It's the key the importer uses to match a row to an existing cat, so it isn't editable by hand in the app.
Step 6: Find a cat later
Cats list. Click 🐈 Cats in the top nav. You'll see every cat, with two rows of filter pills above the list:
- The status row: All (20), Needs TNR (3), Returned (12), and so on, one pill per lifecycle status with a live count. Pick one to see just those cats.
- The tag row below it: 🤰 Pregnant (1), 🤝 Friendly (4), one pill per tag in use, again with counts. Tick as many as you like; a cat matching any ticked tag shows.
Click a pill to switch it on, click it again to switch it off. The status and tag rows work together, so Returned plus 🤝 Friendly narrows to returned cats that are also friendly. If you keep more than one colony, a Filter by colony line sits just under the pills; open it to limit the list to a single colony.
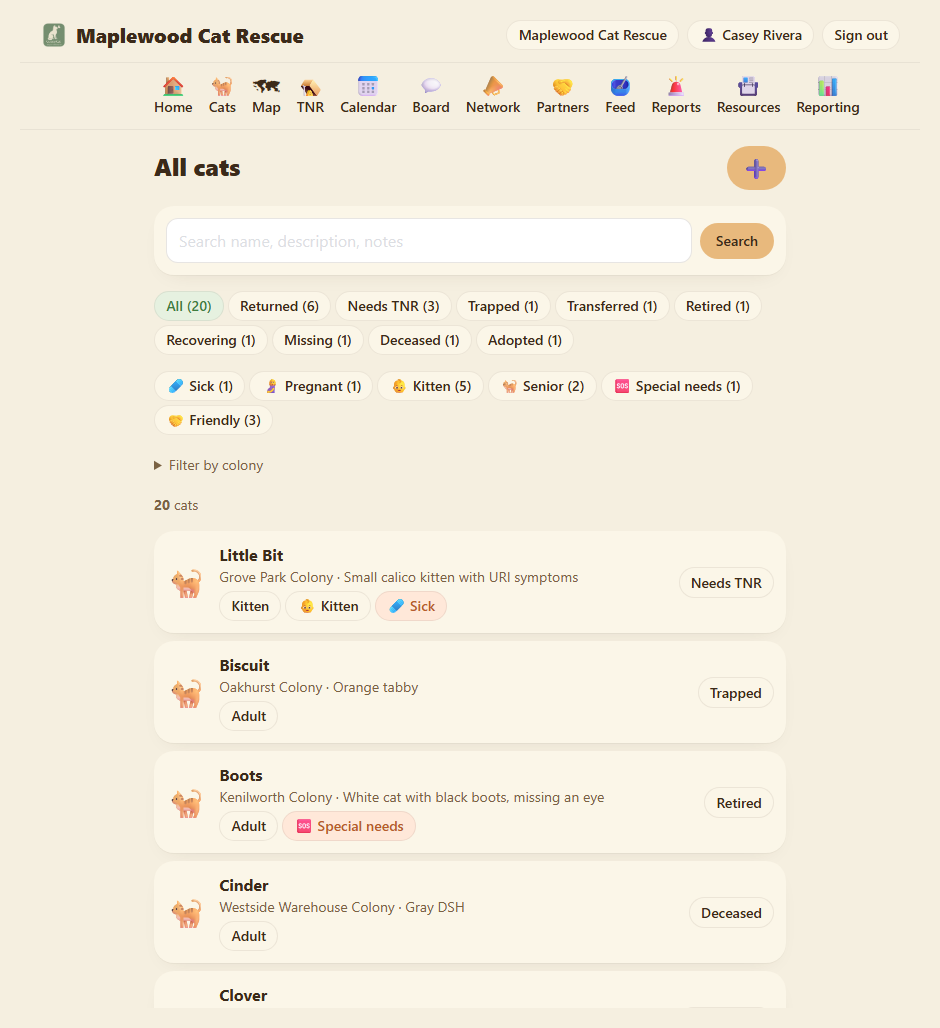
Search. The search box at the top searches the name, the description, and the cat's notes. "calico" finds every cat described as a calico. "notch left ear" finds cats with that distinguishing mark, whether it's in the description or in a note someone logged.
Already keep your cats in a spreadsheet? Import them
Moving to ColonyCat from an Excel sheet or a Google Sheet? You don't have to retype every cat. An OrgAdmin can bulk-import a whole list straight into a colony.
From the colony's page, tap the 📥 button in the cats section (next to ➕ Add cat). Then:
- Download the template (optional). It's a spreadsheet with the right column headings. Fill it in, or skip it and upload your own file.
- Choose your file. Accepts Excel (
.xlsx,.xls) or.csv. The first row should be your column headings. Up to 1,000 cats at a time. - Match your columns. ColonyCat guesses which of your columns is the name, the sex, the status, and so on. Fix any it got wrong, or set ones you don't want to (skip).
- Preview. You see exactly what will be created. Anything it doesn't recognize (an odd status, a misspelled tag) is flagged so you can decide, and those fields just import blank. Rows with no name are skipped.
- Tick Skip cats already in this colony with the same name if you're topping up a list you imported before, then tap Import cats.
Every cat in the file lands in the colony you started from. You don't map a colony column, because the page already knows which colony you're in. Imported cats are normal records: open any one to add photos, notes, and the rest.
Importing the whole group at once
The per-colony import above is one colony at a time. If you have a single spreadsheet with cats from several colonies, there's an org-wide importer at /cats/import.
Heads up: there's no button for it on the Cats page. The quickest way in is to type yourgroup.colonycat.org/cats/import in the address bar. It's also cross-linked from the colony importer: on the dashboard, tap the 📥 next to ➕, and the colonies-import page has an Import cats instead → link. (Like the other imports, it's OrgAdmin-only.)
The steps are the same download / choose / match / preview flow, with two additions:
- Where do these cats go? A picker at the top. Leave it on Match each cat to its colony by the Colony code column and each row drops into the colony whose code it names (so set your colony codes first). Or pick a single colony from the list to drop every cat there, which is the same as the per-colony import but reachable up front.
- Cat ID and updating. Include a Cat ID column (your own ID for each cat) and you can re-run the import later to update those same cats instead of creating duplicates. Ticking Update cats whose Cat ID already exists is off by default, so an import can't overwrite existing cats by accident. An update only touches the columns your file actually includes, and only moves a cat to a different colony when that row names one.
Where you are now
- Your colony has at least one cat.
- The dashboard's numbers update to reflect what you've added.
- You can find any cat by colony, tag, or search.
In Chapter 4 we walk through the TNR workflow, which is where ColonyCat earns its keep on the operational side.
A few sanity-savers
- Edit anything later. Got the sex wrong, found out the cat is named after a soap opera character? An OrgAdmin or staff member can click Edit on the cat page to fix it. Nothing is locked in. (Editing and deleting cats is limited to admins and staff; any volunteer can still add a new cat.)
- Photos stay private. Cat photos only show inside ColonyCat to your members. They don't appear on your public landing page or in the directory.
- Friendly cats vs. community cats. A Friendly tag doesn't mean adoptable, some friendly cats are happiest staying in their colony with their friends. Use the In foster or Adopted statuses when an adoption is actually in motion.
- Tags get filterable. A volunteer asking "who's pregnant right now?" can find out in two clicks. Worth tagging when you see something.
→ Next: Chapter 4: The TNR workflow