 ColonyCat
Setting up your first colony
In ColonyCat a colony is a place where cats live and you care for them. The bridge underpass on the south end of town. The breezeway behind the coffee shop. Your aunt's barn. Wherever you go to feed and check on cats counts as a colony.
This chapter shows you how to add one and what each field is for.
What you're about to do
- Tap ➕ Add colony from your dashboard.
- Give the colony a name and the address where it lives.
- Optionally jot down who feeds it, what it eats, and anything risky to know.
- Save. Your colony shows up on the map with a pin.
Step 1: Add a colony
From your dashboard (the home screen), find the Colonies section and tap the ➕ button at the top of it.
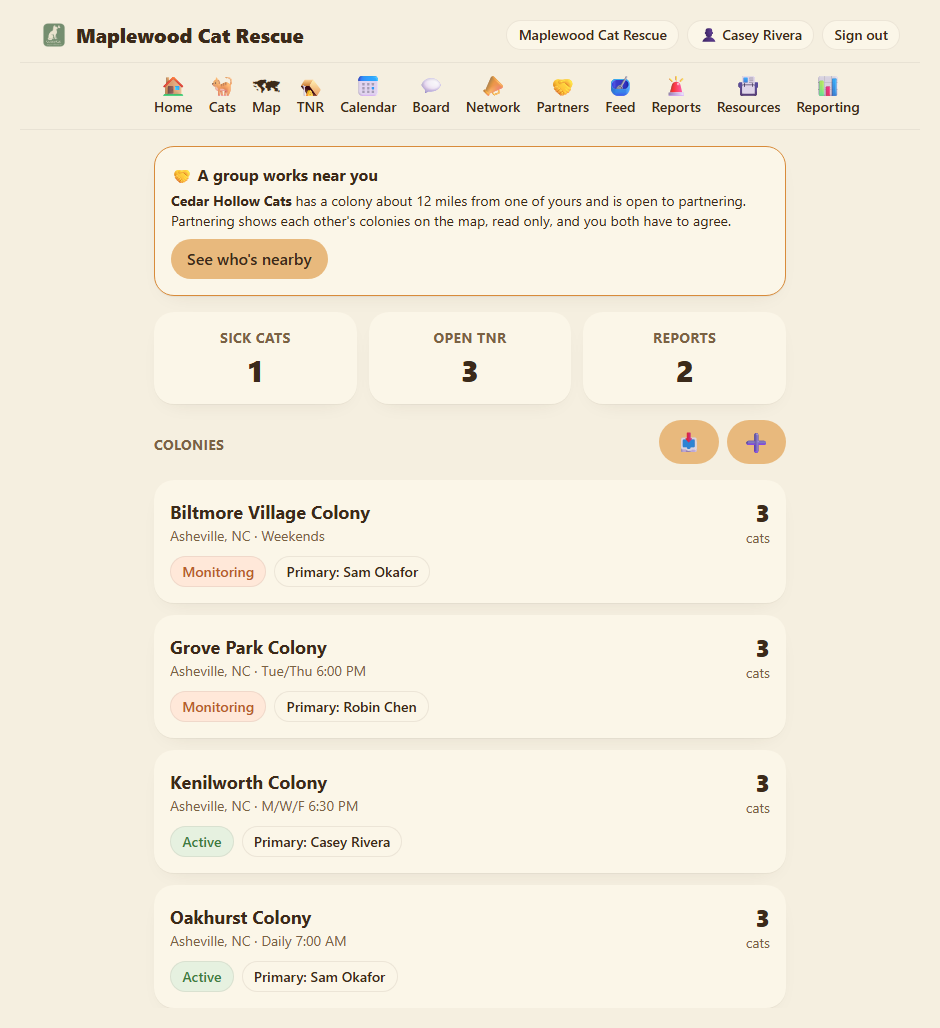
You'll land on a form titled New colony. Don't be intimidated by the number of fields, most of them are optional, and you can edit anything later.
Step 2: Name and address
Colony name. Use something you'd recognize on a glance. "Riverside Bridge" beats "Colony #4." If two of your colonies are near each other, throw in a side-of-the-street hint: "Magnolia Ave, north side."
Code (optional). A short external key like "C-001" that you use in your own records. Once you save a code, it locks in place and can't be changed, because the system uses it to match future bulk imports. Changing it later would break your import workflow. If you're not doing bulk imports, you can leave this blank.
Status. Leave it on Active for a new colony. Use Inactive if you've stopped feeding there (cats relocated, building demolished, etc.), or Monitoring if the site is temporarily paused. Inactive and Monitoring colonies stay in your records but can be hidden from the main lists.
Street address or landmark. Type the street address if you know it. If it's not addressable ("the empty lot behind the school"), type a landmark that gets close. The system uses this to drop a pin on your map.
Tip: use your current location. Standing at the colony with your phone? Tap Use my current location. Your browser asks permission, then auto-fills the address from where you're standing. Faster than typing and almost always more accurate.
City, State / region, and Zip. Standard mailing address fields. The zip code is optional but helpful for bulk imports and routing.
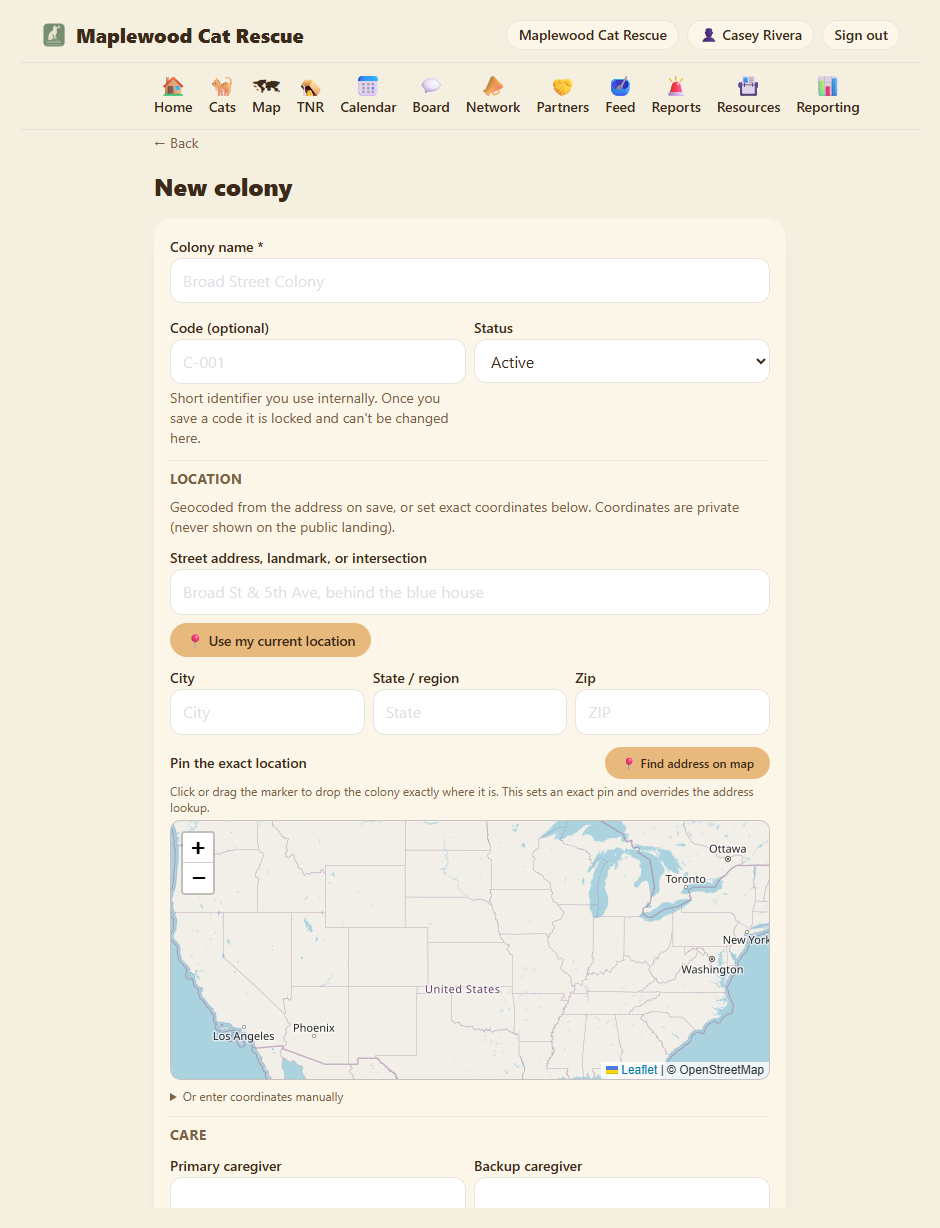
Step 3: Who cares for it and the estimated size (optional)
Primary caregiver. The volunteer who feeds this colony most often. If it's you, put your name. If you don't know yet, leave it blank.
Backup caregiver. Who covers when the primary is sick or on vacation.
Feeding schedule. "Daily 7:00 AM" or "MWF evenings", free text, just describe it in words. This shows up on the colony page so any volunteer knows what's normal.
Estimated colony size. Your best guess of how many cats live here, including ones not yet logged individually. This number doesn't update automatically, so if you log more cats than your estimate, the app will remind you that it's time to update the guess. The actual count of logged and ear-tipped cats is tracked separately from cat records, so you always see the real live tally.
Step 4: Pin the exact location on the map
Before we move on, let's drop a precise pin for this colony.
Geocoded from the address (the default): The system looks up your street address and pins it automatically when you save. If the address resolves to a specific spot, you're done. If the address is too vague (just a city name, or a landmark), the system shows an "approximate pin" warning: the pin lands at the town center, not the exact spot. Read the warning text for how to fix it.
Find address on map: Click the 📍 Find address on map button to let the system search for your address and jump the map there. Then click or drag the marker to fine-tune it.
Click or drag the marker: You can always click anywhere on the map to drop a new pin, or drag the marker to move it exactly where the colony is.
Set coordinates manually: If you'd rather type in exact latitude and longitude (maybe you have GPS data), scroll down to Or enter coordinates manually and fill in both fields. The map updates as you type.
The coordinates are always private (never shown on your public landing page). The public page only shows the colony's name and a general area.
Step 5: Risks, supplies, and visibility (optional)
Risk notes. Anything a new volunteer should know before they show up. Examples:
- "Property owner is supportive but the neighbor is hostile. Don't park in front of the duplex."
- "Heavy traffic on the bridge. Park on the side street, walk."
- "Big black dog runs loose Tuesdays. Skip that day."
Supplies needed. A starting list of what you're low on. "Wet food, blankets for winter, traps for kittens." This is just a note; the real live checklist builds up as volunteers log feedings and note what's needed (Chapter 5).
Keep this colony private. Your public page lists the colonies you care for by name (with a general area and cat count, never the street address). If you'd rather not advertise a particular site at all, tick Keep this colony private and it's left off your public page entirely. It also keeps this colony from being shared with any partner groups (even if you have partnerships). It still works normally inside ColonyCat for you and your team.
Shared with partners. If your group has active partnerships (Chapter 15), you'll see a list of your partners here. By default, colonies are shared with partners so they can see them on the map (read only, they can't edit). Untick a partner to withhold that one colony from them. A private colony is never shared with anyone, even if you don't untick the partner here.
When everything looks right, click Create colony.
Step 6: See it on the map
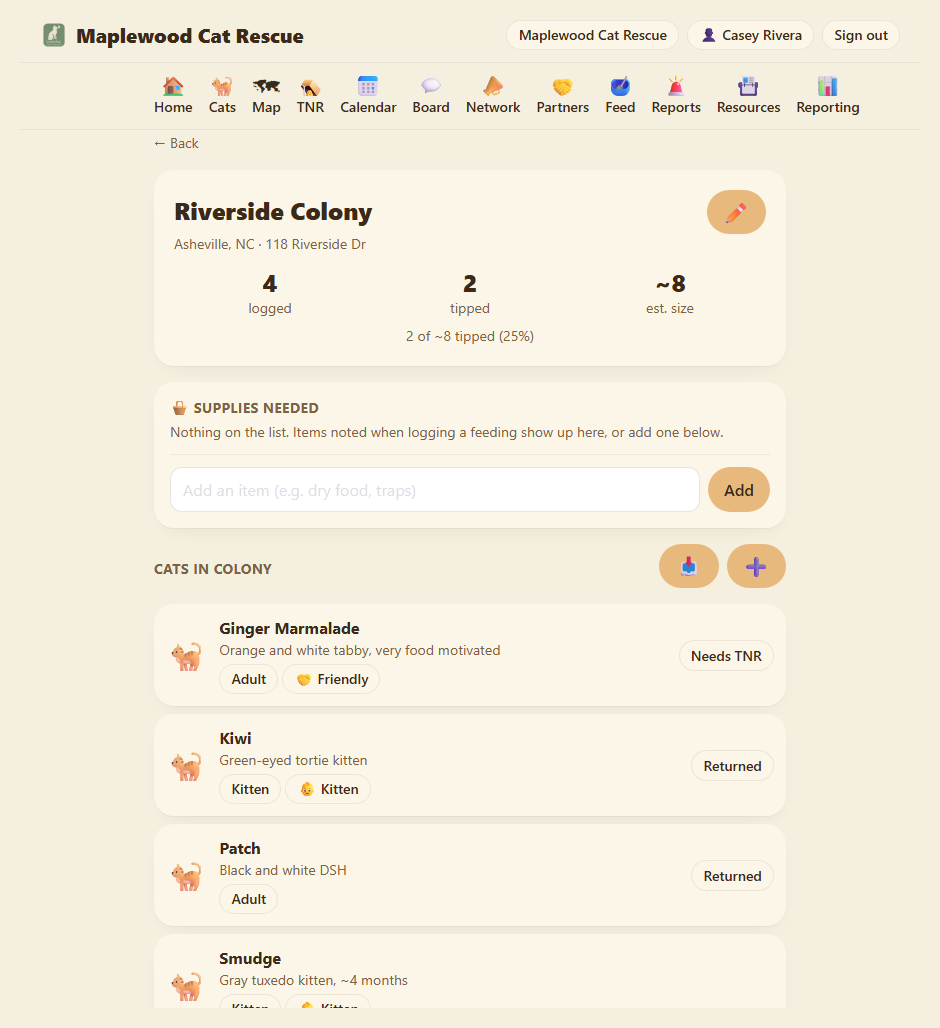
You land on the new colony's page. Note three numbers at the top:
- logged: How many individual cats you've recorded at this colony (zero for a new one).
- tipped: How many of those logged cats are already ear-tipped (zero for a new one).
- est. size: The estimated colony size you entered (the guess, not the count). Shows as "~N" (e.g. ~15).
Up at the top, click 🗺 Map in the navigation. Your colony shows up as a pin where you said it lives.
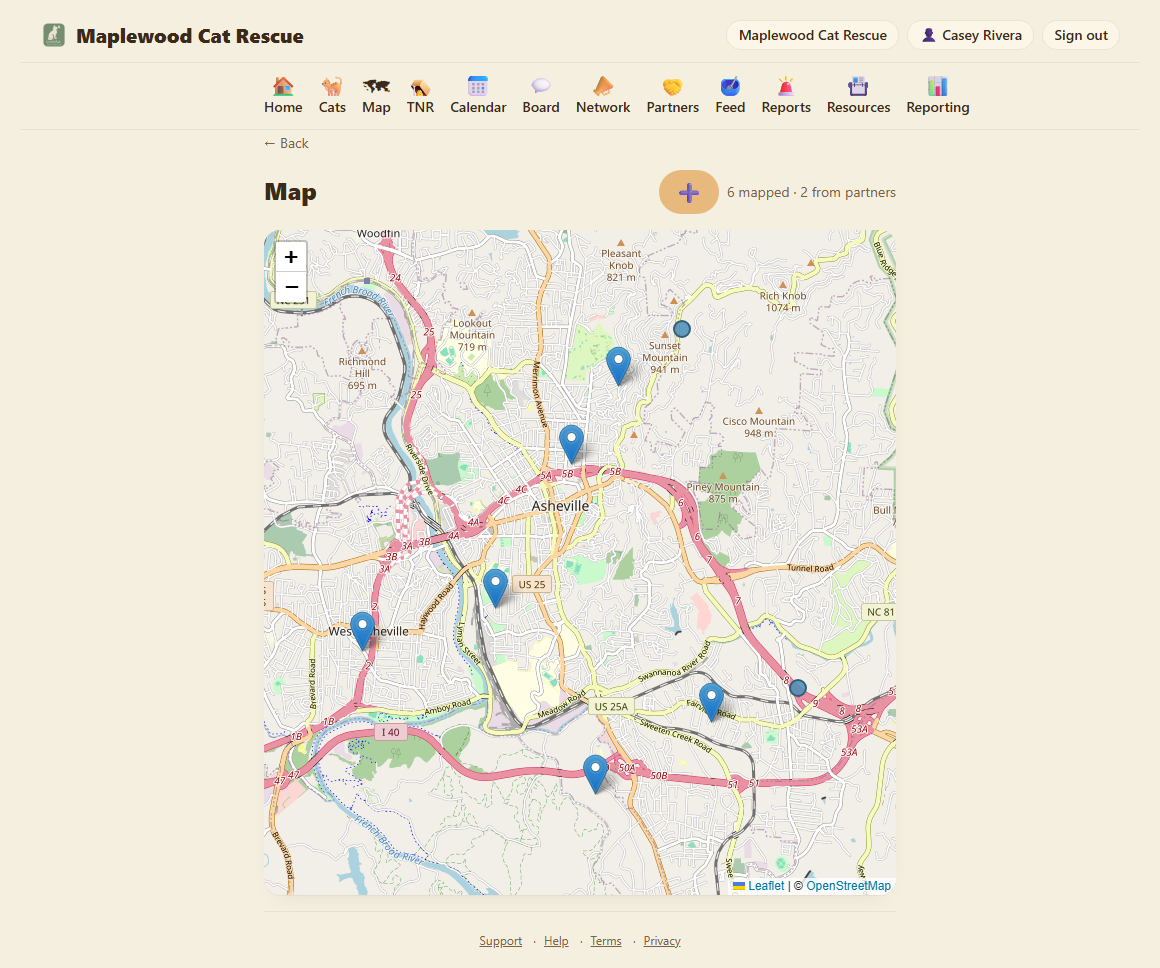
Whenever you add another colony, it gets its own pin. The map is just a quick way to see your whole territory at a glance.
Step 7: The supplies checklist
Every colony page has a 🧺 Supplies needed checklist near the top: a running, checkable list of what this colony is low on. Any member with access to the colony can use it.
- Add an item in the box at the bottom of the list ("dry food, traps, dewormer", comma-separate a few at once).
- Items add themselves from feeding logs. When a volunteer notes supplies on a feeding (Chapter 5), those items show up here automatically, tagged from a feeding, so a shopper sees them without reading every log.
- Check one off when you've got it. Tap the box and it moves to a Recently got section (with the date) so there's a record, not just a vanished line.
This is the practical "what do we need to buy" view. The free-text Supplies needed field on the colony form is just a starting note; the checklist on the colony page is the live list everyone works from.
Adding more colonies. Three easy paths: from the dashboard, the ➕ button sits at the top of your Colonies list. From the Map page, the same ➕ button sits next to the colony count up top. Or use the bulk import button (📥) on the dashboard if you have a spreadsheet with a bunch of them. All three drop you on the form or the import uploader.
Wrong location on the map? Open the colony (tap its name on the map, or go to it from the Colonies list), tap the ✏️ edit button, change the address or re-pin on the map, and save again. The pin updates on the next save.
Bulk import colonies from a spreadsheet. If you already have your colonies in a spreadsheet, OrgAdmins can import them all at once. Look for the 📥 button on the dashboard next to the ➕ Add colony button. This saves a lot of data entry.
Where you are now
- You have one colony on record.
- It has a name, an address, and a pin on the map.
- It has zero cats, they come next.
In Chapter 3 we add individual cat records, with tags, photos, and personality notes.
A few sanity-savers
- The address is always private. The street address you type never appears on your public page, ever, colony locations are sensitive info. Visitors do see the colony's name, a general area (city/region), and a cat count in a "Colonies we care for" list. If even that's more than you want for a given site, use the Keep this colony private toggle to leave it off the public page entirely.
- You can add as many colonies as you like. No limits on the free plan or any plan. Add the bridge underpass, your back porch, the alley behind the diner. Each one stays its own page with its own cats and feeding log.
- Deleting is hard on purpose. A colony with cats or trap nights on file can't be deleted by accident, you have to clear those first. This is to stop a stray click from wiping out a year of records.
- Already have a list of cats? An OrgAdmin can bulk-import them into a colony from a spreadsheet, the 📥 button sits next to ➕ Add cat on the colony page. See Chapter 3.
→ Next: Chapter 3: Adding cats